Best Pistachio Dream Cookie Bars – Easy Holiday Dessert
If you have ever wanted a dessert that stops people mid-conversation the moment it lands on the table, these Pistachio Dream Cookie Bars are exactly that. Buttery, chewy, and packed with the rich, nutty flavor of real pistachios, they hit every note you want from a great dessert bar recipe: a golden shortbread-style base, a creamy pistachio layer, and a finish that feels almost luxurious without requiring pastry school training. Whether you are baking for a holiday gathering, a weekend treat, or simply because you believe in the philosophy to eat dessert first, this recipe delivers every single time.
What makes these bars truly special is how accessible they are. This is not a fussy, multi-day project. It comes together in under an hour with pantry-friendly ingredients and one 9×13 baking pan. Pistachio recipes often feel intimidating, but this one is designed to be approachable for bakers of all levels. Once you pull that first tray out of the oven and the kitchen smells like toasted nuts and brown butter, you will understand why this has become a go-to in so many households.
Recipe Highlights
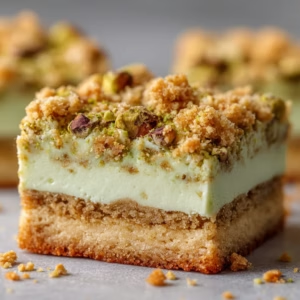
- Stunning visual appeal: The vibrant green pistachio topping makes these bars look impressive with almost no extra effort, perfect for gifting or party platters.
- Deeply satisfying texture: You get a crisp, buttery base paired with a soft, fudgy middle layer, giving every bite real contrast and richness.
- Perfect for making ahead: These bars actually taste better the next day as the flavors settle, making them ideal for easy holiday desserts that do not require last-minute stress.
- Crowd-pleasing versatility: From casual weeknight treats to elegant holiday dessert recipes, these bars fit every occasion without any adaptation needed.
What You’ll Need
- Unsalted butter (1 cup, softened): The foundation of the shortbread base; softened butter creates a tender, melt-in-your-mouth crumb.
- Powdered sugar (3/4 cup): Gives the base its delicate sweetness and fine texture without the graininess of granulated sugar.
- All-purpose flour (2 cups): Provides structure to the cookie layer; spoon and level for accuracy.
- Salt (1/2 teaspoon): Balances the sweetness and enhances the pistachio flavor throughout.
- Cream cheese (8 oz, softened): The backbone of the creamy filling layer; full-fat works best here.
- Instant pistachio pudding mix (2 packages, 3.4 oz each): The secret weapon for intense pistachio flavor and that signature dreamy green color.
- Whole milk (2 1/2 cups): Brings the pudding layer together into a thick, luscious filling.
- Whipped topping (8 oz, thawed): Folded into the filling to lighten it and add that cloud-like, mousse-style texture.
- Shelled pistachios (1/2 cup, roughly chopped): Scattered on top for crunch, color, and a beautiful finishing touch.
- White chocolate chips (1/4 cup, optional): A drizzle on top adds elegance and a gentle sweetness that complements the nuts perfectly.
Using quality ingredients and the right equipment really does make a difference in cookie bar recipes like this one.
Here’s the complete recipe:
Irresistible Pistachio Dream Cookie Bars
Equipment
- 9x13 inch baking pan
- Parchment paper
- Stand mixer or hand mixer
- Large mixing bowl
- Rubber spatula
- Offset spatula
- Wire cooling rack
Ingredients
Shortbread Base
- 1 cup unsalted butter softened to room temperature
- 3/4 cup powdered sugar sifted
- 2 cups all-purpose flour spooned and leveled
- 1/2 teaspoon salt
Pistachio Cream Filling
- 8 oz cream cheese full-fat, softened
- 2 packages instant pistachio pudding mix 3.4 oz each
- 2 1/2 cups whole milk cold
- 8 oz whipped topping such as Cool Whip, thawed
Topping
- 1/2 cup shelled pistachios roughly chopped
- 1/4 cup white chocolate chips melted, optional for drizzle
Instructions
- Preheat your oven to 350 degrees F (175 degrees C). Lightly grease a 9x13 inch baking pan and line it with parchment paper, leaving an overhang on the long sides for easy lifting later.
- In a large bowl, beat the softened butter and powdered sugar together with a hand mixer or stand mixer on medium speed for about 2 minutes until the mixture is light and fluffy. Add the flour and salt and mix on low speed until a soft, crumbly dough forms.
- Transfer the dough to the prepared baking pan and press it into an even layer across the bottom using your fingertips or the flat base of a measuring cup. The layer should be uniform so it bakes evenly.
- Bake the shortbread base for 18 to 22 minutes, until the edges are just turning golden and the center looks set. Remove from the oven and place on a wire rack. Allow to cool completely, at least 30 to 40 minutes, before adding the filling.
- In a large bowl, beat the softened cream cheese on medium speed until completely smooth with no lumps, about 2 minutes. Add both packages of instant pistachio pudding mix and beat to combine. Pour in the cold whole milk and beat on medium speed for 2 minutes until the mixture thickens into a creamy, pudding-like consistency.
- Add the thawed whipped topping to the pistachio mixture and fold it in gently using a rubber spatula, using slow sweeping motions from the bottom of the bowl upward. Stop as soon as the mixture is uniform to preserve the light, airy texture.
- Spoon the pistachio filling onto the completely cooled shortbread base and spread it into an even layer using an offset spatula. Take your time here for a smooth, professional-looking surface.
- Scatter the roughly chopped pistachios evenly across the top of the filling. If using the white chocolate drizzle, melt the white chocolate chips in 20-second microwave intervals, stirring between each, then drizzle over the bars with a spoon or piping bag.
- Cover the pan tightly with plastic wrap and refrigerate for a minimum of 4 hours. Overnight chilling is strongly recommended for the best texture and flavor. Once set, lift the slab out using the parchment overhang and slice into bars with a sharp knife, wiping the blade clean between cuts.
Notes
Make It Your Own
- Swap the nuts: Not a pistachio fan in the group? Try almond pudding mix with slivered almonds on top for a completely different but equally delicious pistachio bar-style dessert.
- Add a chocolate base: Press a thin layer of melted dark chocolate over the baked shortbread before adding the filling for a chocolate-pistachio combination that feels truly indulgent.
- Go gluten-free: Substitute a reliable 1-to-1 gluten-free flour blend in the base layer; the filling is naturally gluten-free already.
- Citrus brightness: Stir 1 teaspoon of fresh lemon or orange zest into the cream cheese filling to lift the richness with a pop of brightness.
Step-by-Step Instructions
- Preheat and prep: Heat your oven to 350 degrees F (175 degrees C) and lightly grease a 9×13 inch baking pan; lining with parchment paper with overhanging edges makes lifting the bars out effortless later.
- Make the shortbread base: Beat the softened butter and powdered sugar together until light and fluffy, about 2 minutes, then mix in flour and salt until a soft, crumbly dough forms; press this evenly into the bottom of the prepared pan using your fingertips or the flat base of a measuring cup.
- Bake the base: Slide the pan into the preheated oven and bake for 18 to 22 minutes until the edges are just turning golden and the center looks set but not browned; remove and let it cool completely before adding the filling, at least 30 minutes.
- Prepare the pistachio filling: Beat the softened cream cheese until smooth and lump-free, then whisk in both packages of pistachio pudding mix followed by the whole milk; beat on medium speed for 2 minutes until the mixture thickens noticeably.
- Fold in the whipped topping: Gently fold the thawed whipped topping into the pistachio mixture using a rubber spatula, using slow, sweeping motions to keep as much air in the filling as possible.
- Assemble the bars: Spread the pistachio filling evenly over the completely cooled shortbread base, smoothing the top with an offset spatula for a clean, professional look.
- Top and chill: Scatter the roughly chopped pistachios across the top and drizzle with melted white chocolate if using; cover the pan and refrigerate for a minimum of 4 hours or overnight before slicing.
- Slice and serve: Lift the chilled slab out using the parchment overhang and cut into bars with a sharp knife wiped clean between cuts for neat, bakery-worthy edges.
Tips for Best Results
- Cool the base completely: This is non-negotiable. Adding the filling to a warm base will cause it to melt, slide, and lose its structure. Give it a full 30 minutes at minimum on a wire rack.
- Use full-fat cream cheese: Low-fat versions introduce extra moisture and can make the filling too loose to hold its shape when sliced. Full-fat gives you clean, defined bars.
- Do not skip the chill time: Four hours in the refrigerator is the minimum, but overnight is genuinely better. The filling firms up, the flavors deepen, and slicing becomes much cleaner.
- Avoid over-mixing after adding whipped topping: Folding too aggressively deflates the air you need for that light, mousse-like texture; a few gentle strokes with visible streaks still disappearing is the sweet spot.
Chef’s tip: For the cleanest cuts, run your knife under hot water, dry it quickly, and slice. Repeat the wipe-and-warm process between each cut. It takes an extra minute but the results look truly professional.
Serving Suggestions
- Holiday dessert trays: These Pistachio Bars look stunning arranged alongside chocolate truffles and pecan shortbreads on a tiered platter for festive gatherings.
- Garnish with flair: A light dusting of crushed freeze-dried raspberries over the top adds a pop of red that makes these bars feel extra celebratory for the holidays.
- Pair with coffee or tea: The richness of the pistachio dessert filling pairs beautifully with a strong espresso, black tea, or a lightly sweetened chai latte.
- Individual dessert cups: Cut bars into smaller squares and serve in mini cupcake liners for a grab-and-go dessert table presentation that guests will love.
Make Ahead and Storage
- Refrigerator storage: Store leftover bars in an airtight container or covered tightly with plastic wrap in the refrigerator for up to 5 days; the texture remains excellent through day three and only softens slightly after that.
- Freezing the bars: These freeze surprisingly well. Arrange cut bars in a single layer on a baking sheet, freeze until solid (about 2 hours), then transfer to a freezer-safe zip bag with parchment between layers; they keep for up to 2 months.
- Thawing from frozen: Move bars from the freezer to the refrigerator the night before serving and let them thaw slowly overnight; avoid thawing at room temperature as condensation can make the topping weep.
- Do not reheat: These are a cold dessert by nature; serving them chilled directly from the fridge is always the best experience.
Your Questions Answered
Can I use homemade whipped cream instead of whipped topping?
Yes, absolutely. Whip 1 cup of heavy cream to stiff peaks and use it in place of the store-bought whipped topping. The result is slightly less stable but even more flavorful and works beautifully if you plan to serve the bars the same day.
Are these the same as classic pistachio pudding bars?
They are inspired by that nostalgic concept but elevated with a from-scratch shortbread base and a richer cream cheese layer, giving you more depth and a sturdier texture than older versions of the recipe.
Can I make these bars nut-free?
You can omit the chopped pistachios from the topping entirely and the bars will still taste wonderful thanks to the pudding mix. Just note that pistachio pudding mix itself is nut-flavored, so this option works for texture preferences but not for nut allergies.
How far in advance can I make these for a party?
These are an ideal make-ahead dessert. Prepare them up to two days before your event, keep them covered in the refrigerator, and add any fresh garnishes right before serving for the best presentation.
Final Thoughts
These Irresistible Pistachio Dream Cookie Bars are the kind of recipe you make once and then find yourself returning to again and again. They are easy enough for a weeknight bake and beautiful enough for your most special holiday dessert recipes spread. Whether you are new to pistachio dessert baking or you have been a fan of pistachio recipes for years, this one belongs in your permanent rotation. Grab your pan, gather your ingredients, and get ready to watch these disappear faster than you ever expected.