Easy Homemade Sourdough Bread Recipe with Crispy Crust
There is something deeply satisfying about pulling freshly baked sourdough bread loaves out of the oven, the crust crackling as it cools and the tangy aroma filling every corner of your kitchen. This easy homemade sourdough bread recipe with a crispy crust is the kind of project that rewards patience with pure, golden perfection. Whether you are new to bread baking or have been nurturing a starter for years, this recipe is designed to be approachable, forgiving, and absolutely delicious.
The beauty of homemade bread with sourdough starter is that each loaf carries its own personality. The long fermentation develops deep, complex flavor that no store-bought bread can replicate. Even better, this recipe is set up so you can bake sourdough bread 2 loaves at once, making it ideal for sharing, gifting, or stocking your freezer with something truly special.
What Makes This Recipe Special
- Naturally fermented flavor: The extended cold proof develops the classic tangy depth that sourdough lovers crave, without any commercial yeast.
- Perfectly crackling crust: Baking in a Dutch oven traps steam during the first phase of cooking, producing that bakery-style crisp exterior on every homemade sourdough loaf.
- Doubles beautifully: This recipe is specifically scaled for sourdough bread 2 loaves, so you get twice the reward for nearly the same effort.
- Beginner friendly: Clear timing, simple shaping, and straightforward steps make these homemade sourdough loaves accessible for any skill level.
Essential Ingredients
- Bread flour (800g): Higher protein content gives the dough strength and chew. All-purpose flour works in a pinch but bread flour produces a superior rise.
- Active sourdough starter (175g): Fed and bubbly, at peak activity within the last 4 to 8 hours. This is the engine behind your homemade sour dough bread recipes easy enough to repeat weekly.
- Filtered water (575g, room temperature): Chlorine in tap water can inhibit fermentation, so filtered or overnight-rested tap water is preferred.
- Fine sea salt (18g): Added after initial mixing to avoid inhibiting the starter. Salt controls fermentation and enhances flavor.
- Rice flour (for dusting): Non-sticky and ideal for lining bannetons or bowls so the dough releases cleanly.
Using the right tools and quality ingredients makes a noticeable difference in how your sourdough bread loaf and slices turn out, from open crumb structure to crust thickness. Investing in a kitchen scale and a good Dutch oven will elevate every bake.
Here is the complete recipe:

Easy Homemade Sourdough Bread Recipe with Crispy Crust
Equipment
- Large mixing bowl
- Kitchen scale
- Dutch oven (x2)
- Banneton proofing basket or bowl
- Bread lame or sharp knife
- Wire cooling rack
- Parchment paper
- Instant-read thermometer
Ingredients
- 800 g bread flour plus extra for dusting
- 575 g filtered water room temperature, about 75 degrees F
- 175 g active sourdough starter fed and at peak activity within the last 4 to 8 hours
- 18 g fine sea salt
- 2 tbsp rice flour for dusting bannetons
Instructions
- Combine bread flour and water in a large bowl and mix with your hands until no dry flour remains. Cover with a damp towel and let rest for 45 minutes at room temperature. This autolyse step hydrates the flour and begins gluten development without any kneading.
- After the autolyse, pour the active sourdough starter over the dough and sprinkle the salt on top. Using wet hands, pinch and fold the dough repeatedly for 3 to 5 minutes until the starter and salt are fully incorporated and the dough feels cohesive.
- Cover the bowl and begin bulk fermentation at room temperature (75 to 78 degrees F is ideal) for 4 to 5 hours. During the first 2 hours, perform a set of stretch and folds every 30 minutes for a total of 4 sets: wet your hand, grab one side of the dough, stretch it up, and fold it over to the opposite side. Rotate the bowl 90 degrees and repeat 4 times per set. The dough should feel increasingly airy and elastic as fermentation progresses.
- Once bulk fermentation is complete and the dough has increased by 50 to 75 percent with a domed, jiggly surface, gently turn it onto an unfloured work surface. Divide into two equal pieces using a bench scraper. Pre-shape each piece into a rough round by folding the edges toward the center. Leave uncovered for 20 minutes to relax.
- For the final shape, flip each pre-shaped round and stretch it gently into a rectangle. Fold the top third down, then fold both sides in, and roll the dough toward you to create a tight boule or batard with good surface tension. Drag it across the counter to seal the seam. Dust each banneton or bowl generously with rice flour and place the loaves seam-side up inside. Cover with plastic wrap or a shower cap.
- Refrigerate the shaped loaves for 10 to 16 hours (overnight is ideal). This cold proof slows fermentation, dramatically improves flavor complexity, and makes the dough easier to score. Do not skip this step.
- When ready to bake, place two Dutch ovens (with lids) in the oven and preheat to 500 degrees F (260 degrees C) for at least 45 minutes. The Dutch ovens must be screaming hot before the dough goes in.
- Remove one loaf from the refrigerator at a time. Flip it from the banneton onto a sheet of parchment paper. Using a bread lame or very sharp knife held at a 30 to 45 degree angle, score the top with one confident slash about half an inch deep. Carefully lower the parchment and loaf into the hot Dutch oven using the parchment as a sling and replace the lid. Repeat with the second loaf.
- Bake covered at 500 degrees F for 20 minutes. The steam trapped inside the Dutch oven allows the loaves to expand fully and develop an open crumb before the crust sets.
- Remove the lids and reduce the oven temperature to 450 degrees F (230 degrees C). Continue baking uncovered for 22 to 25 minutes until the crust is a deep, rich mahogany brown. The internal temperature of the bread should reach 205 to 210 degrees F on an instant-read thermometer.
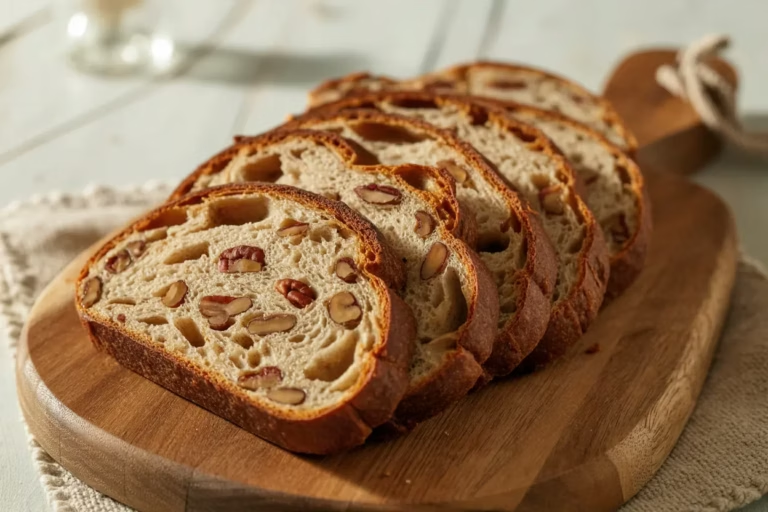
- Transfer the freshly baked sourdough bread loaves to a wire cooling rack. Allow them to cool for a minimum of 1 hour before slicing. The crumb structure continues to set as the loaves cool, and cutting too early will result in a dense, gummy interior. Enjoy the crackle as the crust cools.
Notes
Make It Your Own
- Whole wheat variation: Swap 20 percent of the bread flour for whole wheat flour to add a nutty flavor and extra nutrition to your homemade sourdough loaves.
- Seeded crust: Before the final proof, press sesame seeds, poppy seeds, or everything bagel seasoning onto the surface of each loaf.
- Herb and olive oil swirl: Flatten the dough slightly during shaping, brush with olive oil, and scatter fresh rosemary or thyme before folding and sealing.
- Dark rye addition: Replace 100g of bread flour with dark rye flour for a denser, earthier loaf with beautiful color.
Step-by-Step Instructions
- Mix the dough: In a large bowl, combine bread flour and water and mix until no dry flour remains. Cover and rest for 45 minutes. This autolyse step hydrates the flour and jumpstarts gluten development without any kneading.
- Add starter and salt: Pour your active starter over the dough, sprinkle salt on top, and use wet hands to dimple and fold everything together until fully incorporated, about 3 to 5 minutes.
- Bulk fermentation with stretch and folds: Cover the dough and let it ferment at room temperature for 4 to 5 hours. During the first 2 hours, perform a set of stretch and folds every 30 minutes for a total of 4 sets. The dough should feel airy and jiggly by the end.
- Divide and pre-shape: Turn the dough onto an unfloured surface and divide it into two equal pieces. Gently pre-shape each into a round by folding the edges toward the center. Rest uncovered for 20 minutes.
- Final shape: Shape each piece into a tight boule or batard, building surface tension by dragging it across the counter. Transfer seam-side up into rice-flour-dusted bannetons or bowls lined with floured kitchen towels.
- Cold proof: Cover with plastic wrap or a shower cap and refrigerate overnight, or for 10 to 16 hours. This cold retard is what makes how to make 2 loaves of sourdough so rewarding, the flavor deepens significantly during this rest.
- Preheat and score: Place Dutch ovens in the oven and preheat to 500 degrees F (260 degrees C) for at least 45 minutes. Flip each loaf onto parchment, score the surface with a lame or sharp knife at a 30 to 45 degree angle, then lower into the hot Dutch oven.
- Bake covered: Bake at 500 degrees F with lids on for 20 minutes. The trapped steam allows the loaves to spring open fully before the crust sets.
- Bake uncovered: Remove lids and reduce temperature to 450 degrees F (230 degrees C). Continue baking for 22 to 25 minutes until the crust is deep mahogany brown. Internal temperature should read 205 to 210 degrees F.
- Cool completely: Transfer loaves to a wire rack and resist cutting for at least 1 hour. The crumb continues to set as it cools, and slicing too early results in a gummy interior.
Tips for Best Results
- Use a ripe, active starter: Your starter should be doubling reliably within 4 to 8 hours of feeding before you use it. A sluggish starter leads to dense, under-fermented loaves no matter how perfect your technique is elsewhere.
- Trust the bulk ferment, not the clock: Temperature affects fermentation speed dramatically. Watch for the dough to increase by 50 to 75 percent and feel light and domed rather than sticking rigidly to a timeline.
- Score boldly and at an angle: A shallow or hesitant score will cause the loaf to burst unpredictably. Angle your blade at 30 to 45 degrees and score in one confident motion.
- Avoid the most common mistake, under-baking: Many bakers pull the loaves too early out of fear of burning. A deeply browned crust is not burned. It is caramelized, flavorful, and exactly what gives sourdough bread loaf and slices that iconic bakery quality.
Serving Suggestions
- Slice thickly and serve warm with cultured butter and flaky sea salt for the simplest, most satisfying snack imaginable.
- Use slices as the base for avocado toast, layered with microgreens and a poached egg for a stunning breakfast.
- Pair a rustic slice alongside a bowl of tomato bisque or French onion soup for a cozy, complete lunch.
- Serve your sourdough bread loaf and slices as part of a charcuterie board alongside aged cheeses, cured meats, and grainy mustard.
- Toast thick slices in a cast iron pan with olive oil until golden for bruschetta or crostini.
Make Ahead and Storage
- Room temperature: Once fully cooled, store in a paper bag or bread box at room temperature for up to 3 days. Avoid plastic bags as they trap moisture and soften the crust.
- Refreshing the crust: To revive day-old bread, place the whole loaf directly in a 375 degree F oven for 8 to 10 minutes. The crust crisps back up beautifully.
- Freezing whole loaves: Wrap cooled loaves tightly in plastic wrap followed by a layer of aluminum foil. Freeze for up to 3 months. Thaw overnight at room temperature before refreshing in the oven.
- Freezing sliced bread: Slice before freezing, separate slices with parchment, and store in a zip-lock freezer bag. Pull individual slices and toast directly from frozen.
Your Questions Answered
How do I know when my sourdough starter is ready to use?
Your starter is ready when it has doubled or nearly doubled in size since its last feeding, smells pleasantly tangy and yeasty rather than acidic or alcoholic, and passes the float test: a small spoonful dropped into water should float or at least partially bob.
Can I use this recipe to make just one loaf instead of two?
Absolutely. Simply halve all the ingredient quantities. The timing and method remain the same, though a single smaller loaf may finish baking a few minutes earlier, so start checking the internal temperature around the 18-minute mark after removing the lid.
Why did my sourdough bread come out dense and flat?
The most common culprits are an under-active starter, insufficient bulk fermentation, or cold dough that was not given enough time to warm before scoring and baking. Make sure your starter is genuinely active and your kitchen is warm enough during bulk fermentation.
What is the difference between sourdough bread recipe 2 loaves and baking one at a time?
Baking sourdough bread 2 loaves simultaneously is efficient and produces consistent results since both loaves go through identical oven conditions. You will need two Dutch ovens or a large enough oven to accommodate both. If you only have one Dutch oven, you can bake back to back, keeping the second shaped loaf in the fridge while the first bakes.
Wrapping Up
Mastering this easy homemade sourdough bread recipe with a crispy crust is one of the most rewarding skills you can develop in the kitchen. From the meditative rhythm of the stretch and folds to the extraordinary satisfaction of cracking into a perfectly baked loaf, this process connects you to a tradition that spans thousands of years. Make it once, and you will find yourself reaching for this recipe again and again, experimenting with flavors, sharing loaves with neighbors, and filling your home with one of the best aromas on earth.